How to create your own custom snippets in AL Language | Business Central

Create own custom snippets in Visual Studio Code for AL language. The documentation part any code, we generally, do while doing any development we put the comments over there so that who is the developer is and on which date they do any sort of changes or the creation of a particular object to Documentation is very much important right to an as you know that all these have just created manually but in case I want these lines to be created automatically by just typing my shortcut then it will be very beneficial for the developers so by default Visual Studio provides us this flexibility where we can create our custom


Create own custom snippets in Visual Studio Code for AL language Step :

1. File Menu--> 


Code :

{
    "Create  Custom Comment snippets":{
        "prefix": "tcomment(Custom Mukesh Tri)",
        "body": [
            "/***********************************************************************",
                 "Name : Mukesh Trident.",
                 "Date : $CURRENT_DATE-CURRENT_MONTH-CURRENT_YEAR",
                 "Remarks : ${3}",
            "***********************************************************************/"
        ],
        "description": "Custom Comment snippets Creted by Mukesh TRI"
       

    }

}

For more reference visit the below link

        User Snippets

        Create Custom Code


Continue Reading...

How to Create a Self-Signed Certificate in Windows Using PowerShell


Do you want an SSL certificate for the website development or testing applications instead of buying expensive digital certificates from third-party providers?
 
Using PowerShell command New-SelfSignedCertificate which is a part of PoSh PKI (Public Key Infrastructure) module, you can create Self-Signed Certificate or SSL certificate free of cost.

you’ll have created self-signed certificates with different properties and for different purposes in the PowerShell cmdlet

PowerShell command New-SelfSignedCertificate cmdlet, which is a part of PoSh PKI (Public Key Infrastructure) module

Make sure you have the following requirements.

    1.PowerShell 5.1 or the latest PowerShell.
    2.Your user account must have administrator rights on the local machine.

Setup: 1
 Open PowerShell run as administrator


Setup: 2 
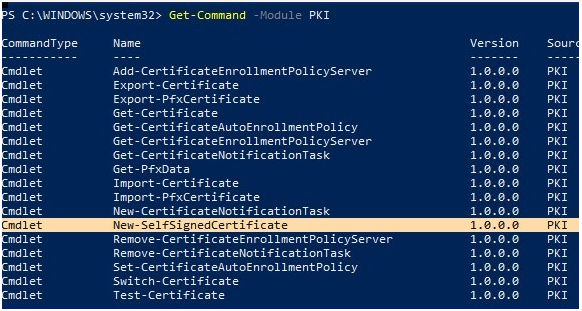
 Check Command Get-Command -Module PKI

Setup : 3
Run the command in PowerShell cmdlet

New-SelfSignedCertificate -DnsName localhost -CertStoreLocation cert:\LocalMachine\My


Or 

$Params = @{
    "DnsName"           = @("MyHost","MyHost2")
    "CertStoreLocation" = "Cert:\LocalMachine\My"
    "NotAfter"          = (Get-Date).AddMonths(6)
    "KeyAlgorithm"      = "RSA"
  "KeyLength"         = "2048"
}

New-SelfSignedCertificate @Params

y default, a self-signed certificate is generated with the following settings:

Cryptographic algorithm: RSA;
Key length: 2048 bit;
Acceptable key usage: Client Authentication and Server Authentication;
The certificate can be used for Digital Signature, Key Encipherment;
Certificate validity period: 1 year.

Using the Get-ChildItem cmdlet, you can display all the parameters of the created certificate by its Thumbprint:

Get-ChildItem -Path "Cert:\LocalMachine\My" | Where-Object Thumbprint -eq 174535541CF0728DAE9FC8FF65401409DF53A03C | Select-Object *


You can create a certificate chain. First, a root certificate (CA) is created, and based on it, an SSL server certificate is generated:

$rootCert = New-SelfSignedCertificate -Subject 'CN=TestRootCA,O=TestRootCA,OU=TestRootCA' -KeyExportPolicy Exportable  -KeyUsage CertSign,CRLSign,DigitalSignature -KeyLength 2048 -KeyUsageProperty All -KeyAlgorithm 'RSA'  -HashAlgorithm 'SHA256'  -Provider 'Microsoft Enhanced RSA and AES Cryptographic Provider'
New-SelfSignedCertificate -CertStoreLocation cert:\LocalMachine\My -DnsName "MyHost" -Signer $rootCert -KeyUsage KeyEncipherment,DigitalSignature

In order to export the generated certificate with a private key to a password-protected PFX file, you need to specify its Thumbprint. It can be copied from the results of the New-SelfSignedCertificate command. You also need to specify the certificate security password and convert it to SecureString format:

$CertPassword = ConvertTo-SecureString -String “YourPassword” -Force –AsPlainText
Export-PfxCertificate -Cert cert:\LocalMachine\My\2779C7928D055B21AAA0Cfe2F6BE1A5C2CA83B30 -FilePath C:\test.pfx -Password $CertPassword

The certificate public key can be exported as follows:
Export-Certificate -Cert Cert:\LocalMachine\My\2779C7928D055B21AAA0Cfe2F6BE1A5C2CA83B30 -FilePath C:\tstcert.cer


you can also generate a wildcard certificate for the entire domain namespace. To do it, specify *.TestHost.com as a server name.

New-SelfSignedCertificate -certstorelocation cert:\localmachine\my -dnsname *.TestHost.com

Document Protection Certificate
Data Protection API can encrypt files on your system using a Document Protection Certificate. Using the New-SelfSignedCertificate cmdlet, we can easily make a certificate to encrypt your documents.

$Params = @{
    "DnsName"           = "MyHost"
    "CertStoreLocation" = "Cert:\CurrentUser\My"
    "KeyUsage"          = "KeyEncipherment","DataEncipherment","KeyAgreement"
    "Type"              = "DocumentEncryptionCert"
}

PS C:\> New-SelfSignedCertificate @Params

for more detail visit Microsft Official.


Continue Reading...

AL Extension Pack - Visual Studio(AL Development)


AL Extension Pack - Visual Studio Code The AL Extension Pack is a collection of extensions for al programming use in Visual Studio Code. 

It was Mr.Waldo. You can find the Extension Packs on the Marketplace under the name AL Extension Pack. Using this extension to improve your Dynamic

Business Central(BC365) AL development in VSCode. Here is a direct link: 

https://marketplace.visualstudio.com

Or Search inside Visual Studio Code
It will automatically install all extensions in Visual Studio Code, that is in the pack, and when Waldo adds a new extension, it will automatically be installed on your system as well. 

 It is a collection of extension


Continue Reading...